Spotlight Positioning
Contents
Introduction
This small tutorial is meant to explain how to position and aim a spotlight. The spotlight function is Props variant, and is enabled using the "SPOTLIGHT" string.
Jbeam Example
"props": [
["func" , "mesh" , "idRef:", "idX:", "idY:" , "baseRotation" , "rotation" , "translation" , "min", "max", "offset", "multiplier"]
{
"lightInnerAngle":0
"lightOuterAngle":120
"lightBrightness":0.25
"lightRange":80
"lightColor":{"r":255, "g":255, "b":200, "a":255}
"lightAttenuation":{"x":0, "y":1, "z":1}
"lightCastShadows":true
"flareName":"vehicleHeadLightFlare"
"flareScale":0.25
"cookieName":"art/special/BNG_light_cookie_headlight.png"
"texSize":512
"shadowSoftness":0.5
}
//low beams angled right slightly to avoid blinding oncoming traffic
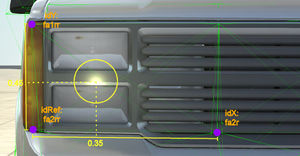
["lowbeam" , "SPOTLIGHT" , "fa2rr", "fa2r", "fa1rr", {"x":180, "y":0, "z":10} , {"x":0, "y":0, "z":0} , {"x":0, "y":0, "z":0}, 0, 0, 0, 1, {"baseTranslation":{"x":0.35, "y":0.2, "z":-0.0},"deformGroup":"pickup_headlightglass_R_break"}],
["lowbeam" , "SPOTLIGHT" , "fa2ll", "fa2l", "fa1ll", {"x":0, "y":0, "z":-20} , {"x":0, "y":0, "z":0} , {"x":0, "y":0, "z":0}, 0, 0, 0, 1, {"baseTranslation":{"x":0.35, "y":0.2, "z":0.0},"lightOuterAngle":75,"deformGroup":"pickup_headlightglass_L_break"}],
//high beams
["highbeam" , "SPOTLIGHT" , "fa2rr", "fa2r", "fa1rr", {"x":180, "y":0, "z":10} , {"x":0, "y":0, "z":0} , {"x":0, "y":0, "z":0}, 0, 0, 0, 1, {"baseTranslation":{"x":0.35, "y":0.45, "z":-0.0},"lightRange":120,"lightBrightness":0.5,"flareScale":0.5,"deformGroup":"pickup_headlightglass_R_break"}],
["highbeam" , "SPOTLIGHT" , "fa2ll", "fa2l", "fa1ll", {"x":0, "y":0, "z":-10} , {"x":0, "y":0, "z":0} , {"x":0, "y":0, "z":0}, 0, 0, 0, 1, {"baseTranslation":{"x":0.35, "y":0.45, "z":0.0},"lightRange":120,"lightBrightness":0.5,"flareScale":0.5,"deformGroup":"pickup_headlightglass_L_break"}],
...
],
Function explanation
The first section of the jbeam defines how a spotlight looks like:
- lightInnerAngle is the angle at which the brightness is max.
- lightOuterAngle is the outer edge of the light beam, the brightness decreases from the inner angle gradually until the outer angle.
- lightBrightness is defined how bright the beam of light is, like how bright the indirect reflection of the light is.
- lightRange is defined how far the light is still being reflected
- lightColor simply defines the color of the light, in RGBA (red, green, blue and alpha)
- lightAttenuation defines how quickly the light is reduced in the respective directions
- lightCastShadows Is defined if a light causes a shadow. Enabling it causes more strain on the GPU.
- flareName defines how the flare looks like (the flare is the light you see looking into the light itself)
- flareScale defines how large this flare is
- cookieName defines the shape and texture of the reflected light.
- texSize defines the resolution of the reflection of the light. Increasing it makes it look smoother but it increases the strain on the GPU.
- shadowSoftness defines how the edge of the shadow looks like
Those variables can also be added to a single spotlight, like in the jbeam example.
Commonly used SPOTLIGHT functions
There are multiple functions which can trigger a light. An overview is below:
- "lowbeam": Is triggered when the lowbeam is enabled.
- "highbeam": Is triggered when the highbeam is enabled.
- "lowhighbeam": Is triggered when the low- and/or highbeam is enabled.
- "signal_R" is triggered when the right signal and/or hazard is enabled.
- "signal_L" is triggered when the left signal and/or hazard is enabled.
- "parking" is currently not being used
- "fog" is triggered when the foglights are enabled (ALT+N)
- "brake" is triggered when the brakes are enabled
- "beaconSpin" is triggerd when the policelights are enabled
- "reverse" is triggered when the reverse gear is enabled
- "running" is an old function and was triggered when the low- and/or highbeam is triggered will stay triggered even when the low- and highbeams are disabled.
Location of the spotlight

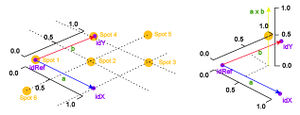
The location of the origin of the spotlight, and thereby position of the flare, is defined like the cross product of two vectors: [1]. In the jbeam you'll see that there's the idRef, idX ad idY node. The vector from idRef to idX is called 'a', and the vector from idRef to idY 'b'. We first focus on positioning the spotlight in the plane defines by a and b. The x and y values in BaseTranslation define where, compared to the X and Y refnodes it is positioned.
Some examples:
- A value of 0 for both X and Y will position it on the idRef node (spot 1)
- A value of 0.5 for both X and Y will position it directly in between the idRef node and isX and idY nodes (spot 2)
- A value of 1 for both X and Y will position it on the outer corner of the a,b plane. (spot3)
- A value of 1 for Y and 0 for X will position it directly on the id Y node (spot 4)
- Values larger than 1 (spot 5) or smaller than 0 (spot 6) are also possible, but take care that when the jbeam structure outside of these refnodes deforms the spotlight won't deform with it.
How far away the spot is located from the a,b plane is defined by the BaseTranslation Z value. It is very like the cross product, with exception that the direction is inverted! It is, like the cross product, always orthogonal to the a,b plane and the distance from the plane is defined like the cross product, ||a|| ||b|| sin(angle between a and b). So it is max when a and b are orthogonal to each other and 0 when they are parallel. The Z value defines where on this a x b vector the origin of the spotlight is located. In the right drawing in the example the X, Y and Z values are all 0.5. The Z value is often very small as the ref nodes are often close to the flexbody's edge and the spotlight often also is. Make sure it is slightly outside the flexbody to have the flare properly shown.
Take note that when a spotlight is mirrored (example the spotlight from the right side is copied to the left side, the direction of the cross product is flipped!
Aiming the spotlight
By adding a value in the BaseRotation part one can aim the spotlight. The values are in degrees, which angle is assigned to x,y or z is viewed in the example. The default direction the spotlight shines is also like the cross product, but again, inverted. Take note that Baserotation Y value has only effect when at least the X and/or Z value are not zero or 180 degrees, otherwise it will rotate around its own axis, which doesn't show an effect.

Other commonly used functions
- The rotation part is sometimes used with beacons. Adding a value defines which axis the spotlight rotates around. It is used in the Moonhawk and Sunburst police beacon for example.
- The deformGroup disables the spotlight when this deformGroup is triggered.
| Vehicle Creation | ||||||||||||||||
|---|---|---|---|---|---|---|---|---|---|---|---|---|---|---|---|---|
| Get started: Introduction to Vehicle Creation | ||||||||||||||||
| ||||||||||||||||
| See also: JBeam Examples • JBeam Physics Theory |