0.8 Add-on Mod Conversion Guide
If you made an add-on vehicle mod before 0.8 that contained engine, transmission, or differential parts, those parts will not work when loaded into the official vehicles in 0.8. Accessories, wheels and visual mod parts will still work fine. This guide will help you convert your modified engines, transmissions, and differentials into the new format.
Engine Conversion
Engines are the most popular things to modify. Luckily the actual engine hasn't changed too much, it has just been repackaged, with a couple name changes for parameters.
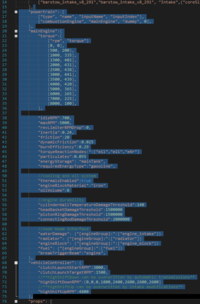
The best approach is to open the relevant official vehicle engine jbeam and copy the whole chunk of "powertrain":{}, "mainEngine:{}, and "vehicleController":{}, like this:
Paste this into your part, between sections, not over them. Now, you can cut and paste the important parameters over, and at the end, delete your old "engine" and "enginetorque" sections. Many things like inertia, friction, idleRPM, maxRPM, and revLimiterRPMDrop are still working exactly the same, but some are different as will be explained.
Torque Curve
The main thing you probably want to preserve is the torque curve. You can simply cut and paste the entries from your "enginetorque":{} table into the "torque":{} table inside of "mainEngine" section. Make sure the header ["rpm", "torque"] is still present. The reason the table is now inside of "mainEngine":{} is so that the powertrain knows that this torque curve applies to mainEngine only, and not other possible engines (remember, multiple engines are supported ;) )
Dynamic Friction
In the old engine section, there was a parameter called brakingCoefRPS. We removed support for that and added the more appropriate dynamicFriction parameter. To convert to the new value, divide your brakingCoefRPS value by 2pi. If you forget this step you will end up with a lot less power!
Shift Points
Shift points are now used by the vehicleController, not the engine. You can edit the values in the "vehicleController" section as you need. Take note that if want to edit lowShiftUp and lowShiftDown, they are now found in the transmission part, not the engine.
Radiators
If your mod has a custom radiator, remember to change the name of the "engine" section to "mainEngine" so that the powertrain knows which engine the parameters apply to. For example:
    "mainEngine":{
        "radiatorArea":0.37,
        "radiatorEffectiveness":7500,
        "coolantVolume":14,
        "radiatorFanType":"mechanical",
        "radiatorFanMaxAirSpeed":2,
        "thermostatTemperature":90
    },
Energy Source and Type
Engines can now look for a specific fuel tank and fuel type using:
        "energyStorage": "mainTank",
        "requiredEnergyType":"gasoline",
If you do not add these lines, the engine will assume infinite fuel, and not affect any fuel tank weight.
Fuel Tanks
The new powertrain system includes a special way to define energy storage. If your mod has its own fuel tank, replace
    "engine":{
        "fuelCapacity":50
    },
With
    "energyStorage": [
        ["type", "name"],
        ["fuelTank", "mainTank"],
    ],
    "mainTank": {
        "energyType":"gasoline",
        "fuelCapacity": 50,
        "fuel": {"[engineGroup]:":["fuel"]},
    }
The energyType needs to match the engine used. The choices are "gasoline", "kerosene" or "diesel" but more may come later. The choice affects the energy content and density of the fuel.
Deprecated "Engine" Parameters
There were some parameters in our old engine files that don't apply any more. Don't bother to copy these into the new engine:
- throttleSensitivity
- clutchTorque
- shiftDownRPM
- shiftUpRPM
- brakingCoefRPS (Look above for information about converting this value to dynamicFriction!!)
New Parameters
See CombustionEngine and Engine_Thermal_Simulation for explanations on what extra parameters are available for you to experiment with.
Superchargers and Turbochargers Conversion
Superchargers and turbochargers sections don't need any changes at all. But, in your supercharger or turbocharger part, you should to add this:
"mainEngine":{
        //supercharger name
        "supercharger":"supercharger",
    },
or
"mainEngine":{
        //turbocharger name
        "turbocharger":"turbocharger",
    },
This tells the powertrain that the "supercharger" or "turbocharger" sections apply to mainEngine.
If you already have an "engine" section there, move the important engine parameters from there into the "mainEngine" section you just created.
Add any shift points from the old "engine" section to the "vehicleController" section.
Then delete the old "engine" section.
Gearbox Conversion
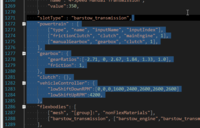
The transmission/gearbox is one of the biggest areas of change in the Powertrain. You should start by copying over the sections (from "powertrain" to "vehicleController") out of the vehicle you are modding, and swap over the important parameters from the "engine" section of your transmission part, like gear ratios and shift points. From there you can add or modify some of the new parameters available.
Transmission Type
the old parameter transmissionType is deprecated. Now, the type of transmission is decided by the choice of devices in the powertrain sections. To control the modes of your transmission (PRNDL, PRNDM, etc) you can use automaticModes in the "vehicleController" section. See VehicleController
Differential Ratio and Axle Friction
differential and axleFriction parameters are deprecated. friction and gearRatio for differentials and axles have to be added to actual shaft or differential devices.
Gear Ratios
The array of gear ratios works just like before, only now it is called "gearRatios" instead of "gears". So just make sure the name is right when you paste in your values.
Deprecated "Engine" Parameters
- differential
- viscousCoupling
- shiftableAuto --now use "M" in automaticModes:{}
- lockingTorqueLimit --now called lockupClutchTorque
- autoGearChangeDelay --now called transmissionShiftDelay
- cvt --choose a cvtGearbox device instead
- clutchDuration -- use clutchInRate, clutchOutRate, and transmissionGearChangeDelay instead
Automatics
Automatic transmission parts include the automaticGearbox and the torqueConverter. The main thing to adjust on the torqueConverter is the diameter. This will affect the stall rpm. Shift points and shifting behavior can be controlled with parameters in the vehicleController section. Strength of the hill holding behavior and park lock can be set. See AutomaticGearbox, TorqueConverter, and VehicleController
Manuals
Manual transmission parts include the manualGearbox and the frictionClutch, auto calculated to handle the torque of the engine and the inertia of the powertrain. Shift points and shifting behavior can be controlled with parameters in the vehicleController section. See ManualGearbox and FrictionClutch, and VehicleController
DCT
DCT transmissions stand alone without a separate clutch. Shift points and shifting behavior can be controlled with parameters in the vehicleController section. See DctGearbox and VehicleController
CVT
CVT can have their min and max ratio, high and low throttle target RPM, and their reaction speed set. CVT gearboxes require a torque converter to work properly. See CvtGearbox and VehicleController
Differentials Conversion
Differentials are now devices in the "Powertrain" section of the differential part. So, the entire "differentials":{} section is deprecated. To upgrade your differentials you will start by copying in the whole powertrain section from the part of the car you are modding. Example:
"powertrain" : [
        ["type", "name", "inputName", "inputIndex"]
        //rear diff
        ["differential", "differential_R", "driveshaft", 1, {"diffType":"locked", "gearRatio":2.83, "lockTorque":20000, "friction":8}]
        //rear left axle
        ["shaft", "wheelaxleRL", "differential_R", 1, {"connectedWheel":"RL", "breakTriggerBeam":"axle_RL", "friction":2}]
        //rear right axle
        ["shaft", "wheelaxleRR", "differential_R", 2, {"connectedWheel":"RR", "breakTriggerBeam":"axle_RR", "friction":2}]
],
Depending on the type of your old differential, you will choose "diffType":"open", "diffType":"lsd", "diffType":"viscous", "diffType":"locked". You should also add in your gearRatio choice. Beware, if you are making custom ratios on a 4WD, the front and rear differentials must match or you will get major lurching/hopping/binding issues! (Hey, it would happen in real life too!)
You can also make a lockable LSD or center differential since 0.10, simply do something like "diffType":"lsd","locked"
Open Differential
Hey, that's easy. All you need is something like:
"powertrain" : [
        ["type", "name", "inputName", "inputIndex"]
...
        ["...", "...", "...", 1, {"diffType":"open", "gearRatio":4, "friction":8}]
...
],
LSD Differential
Try this:
"powertrain" : [
        ["type", "name", "inputName", "inputIndex"]
...
        ["...", "...", "...", 1, {"diffType":"lsd", "lsdPreload":150, "lsdLockCoef":0.3, "lsdRevLockCoef":0.15, "gearRatio":4, "friction":8]
...
],
lsdPreload is kind of like the old closedTorque value, but since we have locking action, you shouldnt need to go so high. 500 is plenty. lsdLockCoef and lsdRevLockCoef determine how hard the lsd locks. Values more than 0.5 are probably overkill. If you want a 2-way diff, choose equal coefficients, if you want a 1 way, choose a tiny number like 0.01 for lsdRevLockCoef.
Viscous Differential
This type didnt exist before but if you want to try it:
"powertrain" : [
        ["type", "name", "inputName", "inputIndex"]
...
        ["...", "...", "...", 1, {"diffType":"viscous", "viscousCoef":25, "viscousTorque":500, "gearRatio":4, "friction":8]
...
],
Locked Differential
Simulate a welded, spool, locked differential
"powertrain" : [
        ["type", "name", "inputName", "inputIndex"]
...
        ["...", "...", "...", 1, {"diffType":"locked", "lockSpring":10000, "gearRatio":4, "friction":8]
...
],
Lockable Differential
Simulates a locker differential:
"powertrain" : [
        ["type", "name", "inputName", "inputIndex"]
...
        ["...", "...", "...", 1, {"diffType":"open","locked", "lockSpring":10000, "gearRatio":4, "friction":8]
...
],
See Differential for all the details. This also works for making a lockable LSD.
2 Wheel Drive to 4 Wheel Drive Conversion
With the new system you will have more freedom to make different choices of powertrain layouts. However, that means its not as easy as just adding extra "differentials" sections. You will have to learn how the Powertrain tree system works to add a center differential, driveshaft, and axle differential. It is a bit outside the scope of some quick fixes. More detailed guides will come soon.
Edit by Justy4WDTURBO: Here is a example of the code I use (originally made by SixSixSevenSeven with major edits by me) in my Covet 4WD CVT mod, combining a transfer case, selectable 4WD and a 3.89 rear differential. This code however, is not plug 'n play, it only serves as an example how the Powertrain tree works. It is also hilariously outdated by now, but the basic principle behind it still stands.
5-speed manual gearbox
"hatch_transmission_5M_TC": {
    "information":{
        "authors":"BeamNG",
        "name":"5-Speed Manual Transmission with Transfer Case",
        "value":250,
    },

    "slotType" : "hatch_transmission",

    "slots": [
        ["type", "default", "description"]
        ["hatch_differential_F","hatch_differential_F", "Front Differential"],
        ["hatch_transfercase","hatch_transfercase_fwd", "Transfer Case"],
    ],
    "powertrain": [
        ["type", "name", "inputName", "inputIndex"],
        ["frictionClutch", "clutch", "mainEngine", 1],
        ["manualGearbox", "gearbox", "clutch", 1],
    ],
    "gearbox": {
        "gearRatios":[-3.15, 0, 3.73, 1.775, 1.20, 0.90, 0.74],
        "friction": 1,
    },
Transfer case
"hatch_transfercase_4wd_hilo": {
  "information":{
        "authors":"SixSixSevenSeven",
        "name":"Four Wheel Drive Transfer Case",
        "value":200,
    },
    "slotType" : "hatch_transfercase",

    "slots": [
        ["type", "default", "description"]
        ["hatch_differential_R","hatch_differential_R", "Rear Differential"],
    ],
    "powertrain" : [
        ["type", "name", "inputName", "inputIndex"]
        ["rangeBox", "rangebox", "gearbox", 1, {"gearRatios":[1,2.19]}]
        ["differential", "transfercase", "rangebox", 1, {"diffType":"locked", "lockTorque":8000, "friction":5}]
        //straight through shaft
        ["shaft", "transfercase_R", "transfercase", 2, {"canDisconnect":true}]
	],
	"slotType" : "hatch_transfercase",
    "controller": [
        ["fileName"],
        ["4wd", {"shaftName":"transfercase_R", "rangeBoxName":"rangebox"}],
    ],
}
3.89 Open rear differential
"hatch_differential_R": {
    "information":{
        "authors":"BeamNG",
        "name":"3.89 Open Rear Differential",
        "value":200,
    },
    "slotType" : "hatch_differential_R",

    "powertrain" : [
        ["type", "name", "inputName", "inputIndex"],
        ["differential", "differential_R", "transfercase_R", 1, {"diffType":"open", "gearRatio": 3.89, "friction":3}],
    ],
| Vehicle Creation | ||||||||||||||||
|---|---|---|---|---|---|---|---|---|---|---|---|---|---|---|---|---|
| Get started: Introduction to Vehicle Creation | ||||||||||||||||
| ||||||||||||||||
| See also: JBeam Examples • JBeam Physics Theory |


