Introduction to skin system
Related guide: http://wiki.beamng.com/Simple_skin_tutorial
Contents
Introduction
What is the Skin System?
The Skin System allows for easy and seamless changes of vehicle textures within the game.
How does it work?
We will take a look at how the Ibishu Covet uses this system. This new system is mainly based on these elements:
- Slot in the main .jbeam file
- Skin slot in any .jbeam file
- New material
- Skin Texture
- Second UV Map
We will look at each one of these individually now, by creating an example skin for the Covet.
Setting up the Workspace
Before starting, we first need to setup our workspace correctly, so that we avoid overwriting any original file.
- Go to 'Documents/BeamNG.Drive/vehicles' and create a new folder named "hatch". This folder will tell the game that any skin inside this folder should be for the Covet.
- In the "hatch" folder, create a new folder called "yourskinfolder" (where 'yourskinfolder' is the name of your folder. Name it 'hatchtest' for now). All the textures and files for our custom Covet skin will go inside this folder.
Basics
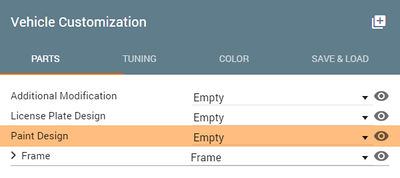
Paint Design Slot (Official vehicles are already equipped with this)
Official BeamNG.drive vehicles come with this slot equipped.
For modded vehicles or any vehicles you find don't have this slot, simply add this to the "slots" section in that vehicle's main .jbeam file (hatch.jbeam for Ibishu Covet):
Code:
["paint_design", "", "Paint Design"],
You can check the 'hatch.jbeam' at line 15 for reference. Since the Covet already has the required slot, we can move on to the Skin slot.
Skin Slot and New Jbeam
You need a Skin slot for each skin you want to use. The code for new skins looks like this:
Code:
   {
   "hatch_skin_YOURSKIN": {
   "information":{
       "authors":"BeamNG",
       "name":"YOUR SKIN NAME",
       "value":200,
   }
   "slotType" : "paint_design",
   "globalSkin" : "YOURSKIN",
   },
   }
Skin slot sections in existing vehicles follow the same format, but do not include the first and last brackets since they are part of existing jbeam files.
It is highly recommended to create a new jbeam file in the skin folder so that the skin isn't broken with updates, however the code (not including the first and last brackets) can be copied into the end of the original 'hatch.jbeam' file if desired.
Using notepad++ or a similar text editor, create a new file called 'hatch_YOURSKIN.jbeam'. Change YOURSKIN to whatever name that you prefer, but preferably something unique so that it doesn't conflict with other skins. This file will be saved into the 'hatchtest' folder we made earlier.
Insert the code segment above into this file, changing YOURSKIN to the name you chose earlier. "YOUR SKIN NAME" will be what is displayed in the BeamNG skin selection menu, while YOURSKIN will be what the program looks for when using the skin. When you are finished, 'hatch_YOURSKIN.jbeam' should contain ONLY the code above, so that it doesn't conflict with official updates or cause errors when trying to use the vehicle. Do not include all the 'hatch.jbeam' definitions in your 'hatch_YOURSKIN.jbeam' file.
You can check the 'hatch.jbeam' line 53 for an example of a skin.
New Material
You will need a new material for each skin, since it will tell the game which textures to use. A new material will look like this:
Code:
   singleton Material("hatch.skin.YOURSKIN")
  {
   mapTo = "hatch.skin.YOURSKIN";
   overlayMap[2] = "vehicles/hatch/hatch_skin_YOURSKIN.dds";
   diffuseMap[2] = "vehicles/hatch/hatch_c.dds";
   specularMap[2] = "vehicles/hatch/hatch_s.dds";
   normalMap[2] = "vehicles/hatch/hatch_n.dds";
   diffuseMap[1] = "vehicles/hatch/hatch_d.dds";
   specularMap[1] = "vehicles/hatch/hatch_s.dds";
   normalMap[1] = "vehicles/hatch/hatch_n.dds";
   diffuseMap[0] = "vehicles/common/null.dds";
   specularMap[0] = "vehicles/common/null.dds";
   normalMap[0] = "vehicles/hatch/hatch_n.dds";
   specularPower[0] = "128";
   pixelSpecular[0] = "1";
   specularPower[1] = "32";
   pixelSpecular[1] = "1";
   specularPower[2] = "128";
   pixelSpecular[2] = "1";
   diffuseColor[0] = "1 1 1 1";
   diffuseColor[1] = "1 1 1 1";
   diffuseColor[2] = "1 1 1 1";
   useAnisotropic[0] = "1";
   useAnisotropic[1] = "1";
   useAnisotropic[2] = "1";
   castShadows = "1";
   translucent = "1";
   translucentBlendOp = "None";
   alphaTest = "0";
   alphaRef = "0";
   dynamicCubemap = true; //cubemap = "BNG_Sky_02_cubemap";
   instanceDiffuse[2] = true;
   materialTag0 = "beamng"; materialTag1 = "vehicle";
   };
Using a text editor again, create a new 'materials.cs' file in the 'hatchtest' folder. In this new file, copy and paste the code segment above. When you are finished, 'materials.cs' should contain ONLY the code above, so that it doesn't conflict with official updates. Do not include all the materials for the car in your 'materials.cs' file.
Change YOURSKIN to the name that you picked earlier, and replace "vehicles/hatch/hatch_skin_YOURSKIN.dds" with "vehicles/hatch/yourskinfolder/hatch_skin_YOURSKIN.dds", where 'yourskinfolder' is the name of the folder for your skin ('hatchtest' in our case).
You can check the 'materials.cs' file in the hatch folder at line 38 for reference.
In the 'materials.cs' file, the 'material name' should always be like 'vehiclematerial.skin.yourskin'.
Skin Texture
This is simply your modified texture. These textures will be in the DirectDraw Surface (.dds) format, so you can edit them in paint.net. You can also edit them in Photoshop with a plugin. Once you finish modifying the texture, save it in the 'hatchtest' folder.
You can check the 'hatch_skin_xx.dds' files in the hatch folder for reference. For ease of editing, you can overlay the UV map for the vehicle into your image editor to see which textures go to which parts of the car (see point 5).
Second UV Map (Official vehicles are already equipped with this)
Official vehicles are getting a second UV Map. It will:
Make skinning easier
Prevent skin mirroring
You can find the UV Textures in the vehicle folder (for example 'hatch_skin_UVs.png') to have a reference when making your skin. The BeamNG devs will soon post all those reference UV here to easy access as well.
Colorable Skins (Advanced)
This part of the guide will cover color-able skins, introduced in version 0.8.0.0.
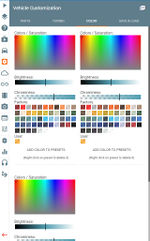
Colors are controlled using the 'Color-Selectors' in the Vehicle Customization > Color menu.
How does it work?
Similarly to how a basic skin works, but with a few changes and additional files. Here's what changes:
- Different Material
- Different Skin Texture
- Additional ColorMap
We will look at each individually now, by taking as example the 'Custom' skin available for the Sunburst
Material
Code:
   singleton Material("sunburst.skin.custom")
   {
   mapTo = "sunburst.skin.custom";
   colorPaletteMap[2] = "vehicles/sunburst/sunburst_skin_custom_palette_uv1.dds";
   overlayMap[2] = "vehicles/sunburst/sunburst_skin_custom.dds";
   diffuseMap[2] = "vehicles/sunburst/sunburst_c.dds";
   specularMap[2] = "vehicles/sunburst/sunburst_s.dds";
   normalMap[2] = "vehicles/sunburst/sunburst_n.dds";
   diffuseMap[1] = "vehicles/sunburst/sunburst_d.dds";
   specularMap[1] = "vehicles/sunburst/sunburst_s.dds";
   normalMap[1] = "vehicles/sunburst/sunburst_n.dds";
   diffuseMap[0] = "vehicles/common/null.dds";
   specularMap[0] = "vehicles/common/null.dds";
   normalMap[0] = "vehicles/sunburst/sunburst_n.dds";
   specularPower[0] = "128";
   pixelSpecular[0] = "1";
   specularPower[1] = "32";
   pixelSpecular[1] = "1";
   specularPower[2] = "128";
   pixelSpecular[2] = "1";
   diffuseColor[0] = "1 1 1 1";
   diffuseColor[1] = "1 1 1 1";
   diffuseColor[2] = "1 1 1 1";
   useAnisotropic[0] = "1";
   useAnisotropic[1] = "1";
   useAnisotropic[2] = "1";
   castShadows = "1";
   translucent = "1";
   translucentBlendOp = "None";
   alphaTest = "0";
   alphaRef = "0";
   dynamicCubemap = true;
   instanceDiffuse[2] = true;
   materialTag0 = "beamng"; materialTag1 = "vehicle";
   };
In addition here we have colorPaletteMap[2] which defines the ColorMap to be used.
We can also control which UvMap the ColorMap can use, by simply adding _uv0 or _uv1 at the end of the file name.
The rest is pretty much the same as the basic skin.
Skin Texture
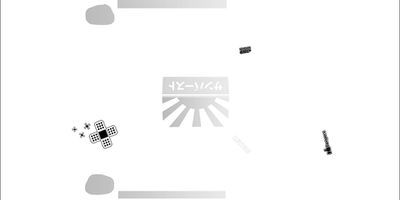
This will work slightly different than the basic skin. Here's how the 'sunburst_skin_custom.dds' file looks like:
Generally, you want to keep all the parts that you want to be color-able in greyscale, so that the ColorMap can multiply the chosen color without issue.
(If for example, you color your skin blue, and then choose yellow in-game, you will get green).
You can color the part that you do not want to be colored by the ColorMap.
ColorMap
This is a new texture. This is how the 'sunburst_skin_custom_palette_uv1.dds' file looks like:
In the Vehicle Customization > Color menu we have 3 color selector. Each one is for a specific color we use.
- Red - All the parts that should be colored by the first color selector (which is also used for the generic vehicle body color).
- Green - All the parts that should be colored by the second color selector.
- Blue - All the parts that should be colored by the third color selector.
- 100% Transparent/Alpha - All the parts that should not be colored (therefore use the color you have in your Skin Texture)
( The color intensity can vary. For example, 50% red means that half of the first color-selector color will be multiplied for example )
Saving the colors for a configuration
In your configuration .json file, simply add these lines:
  {
  "default_color":"Pearl White",
  "default_color_2":"Pearl White",
  "default_color_3":"Pearl White",
  }
This is pretty much self-explanatory. Insert the default color you want to use for each 'color' (between the one available in the main .json file of the vehicle).
If you omit a line, white will be used as default.
If you save a configuration in-game, the colors would be saved directly in the .pc file instead.
Tips and Guidelines for Releasing Skins
To ensure that skin making & distribution works flawlessly for everybody and without any risk of breaking anything, follow these simple guidelines.
Subfolders
As mentioned at the beginning of this guide, this will reduce the risk of overwriting other files. Name your subfolder somewhat unique, so that the risk of another user using the same name is near zero.
If you plan on releasing a skin, you can simply ZIP your skin content and make a folder hierarchy to look like this:
This way, you can just drop your skin ZIP in 'Documents/BeamNG.Drive/mods' and it will work flawlessly.
Materials.cs
In the materials.cs file, the 'material name' should always be like 'vehilclematerial.skin.yourskin'.
Don't do the common mistake of renaming 'skin' to something else. This is a flag so the game knows this is a skin.
File Types
Make sure that your skin texture and the texture referenced in the materials.cs are the same. For example, if you have the skin mentioned as a .dds in your materials.cs, make sure the actual skin texture is a .dds. If the file
types don't match up, you might end up with your skin not appearing correctly.
| Vehicle Creation | ||||||||||||||||
|---|---|---|---|---|---|---|---|---|---|---|---|---|---|---|---|---|
| Get started: Introduction to Vehicle Creation | ||||||||||||||||
| ||||||||||||||||
| See also: JBeam Examples • JBeam Physics Theory |

