Creating static objects
This page will explain the recommended way of modeling static objects (including vegetation) for BeamNG.
Contents
Workflow
The suggested workflow is to begin with a list of assets grouped by type (industrial_buildings, oak_trees etc), sketch them (for reference), model them in single documents based on the types, create small documents with individual objects, and finally export from those objects into the game.
List of assets
Creating a list of assets helps you to work through your project, gives you an understanding of the work involved and your current progress and can help motivate you. It is recommended that you group your assets into types as this makes it easier to create the list and read it. You don't have to be extremely specific, here is an example list.
Buildings:
- 5x apartment blocks (British style)
- 2x small petrol station
- 4x small country house
- 1x pub
Concept art

Concept art is recommended, though not strictly essential. This is best done with rough sketches of what you want to achieve. There are two major benefits of creating concept art; firstly it helps to kill off bad ideas early and with minimal time wasted and secondly it speeds up the modeling process because you don't have to think too much about what you're modeling, just model it.
Things to consider
- Keep in mind where the player will likely view the object from (above, side, front, below) and model it accordingly; don't waste polygons detailing the inside of a building which cannot be entered
- Make sure you keep memory use as low as possible, use tiling textures and common materials where possible and try to keep texture sizes low
- Use lods where possible; the better you use LODs the better performance can be
- For buildings you can often delete the whole interior from the LODs since you won't be able to see it from outside anyway
- For vegetation you should keep in mind that transparent textures will cause a lot of slowdown when in large amounts
- When constructing trees you should build them from samples (a sample might be a branch or something) and then copy it again and again for your tree; this way you can vertex paint it once and not have to worry about it (just make sure you get it right)
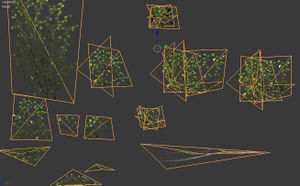
- It's a good idea to model all objects of a similar type in a single document; this makes it easier to see how they compare to each other (size, shape, materials) and speeds up the modeling process
- Create a reference for object scale when modeling (such as a 2m high rectangle to represent a person); this will help you to understand how the object will look in the game.
Modeling static objects

When you have a list of objects and some concept sketches of them modeling should be fairly straight forward. You should begin by getting materials set up (especially important for modeling vegetation) as this will make it easier to understand how the final object will look. Next model one of your objects. You should model it in the highest detail you plan on using in the game, or at the maximum detail required for baking (if you are using a unique material for the object/s) first.
LOD meshes
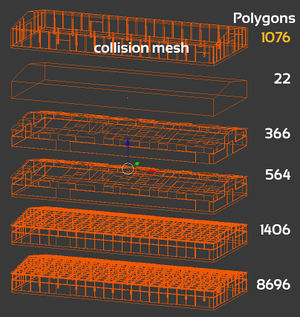
When you are happy with it copy it and place it above before simplifying it for a level of detail (LOD) mesh. You should generally make a lod use 50% or less polygons than the mesh before it (if your main mesh is 1000 polygons try to make your first lod 500 or less).
You'll want to make your LODs as close as you can to the main mesh in their overall appearance or they will "pop" in when you approach them in the game. Sometimes you can stretch parts of the model to fill gaps created by deleting smaller, higher complexity parts of the mesh. Things like cylinders can be simplified quite a lot in LODs without being noticeable; you might have a 12 sided cylinder for the main mesh but a 3 sided one may be sufficient for a LOD.
The number of LODs varies on an individual object basis. As a general rule you should at least halve the complexity every LOD where possible until the mesh is extremely simple (~10 > 50 polygons). You can then use an "empty" called "bb__autobillboard25" in your final export file to generate billboards for the object (2 polygons).
Most meshes will have a main mesh, one to two LOD meshes and a billboard.
Collision mesh
The collision mesh is what your vehicle will collide with. This can be your main visible mesh or a LOD mesh but it is strongly recommended that you create a custom mesh to avoid wasting processing power. It should be as simple as possible, however, keep the following in mind when making your meshes:
- Objects with collision meshes smaller than 300mm wide will cause your vehicle to get stuck in a crash, it is recommended you ensure the narrowest part of your meshes are 350mm to 400mm wide at a minimum
- Crashing into sharp angles on objects can cause problems, to avoid this you can make objects like power poles at least 5 sided cylinders, 6 is recommended
- Ensure your normals face outwards or the object will eat cars
Vegetation

Vegetation should be created using a 3D modeling program and then placed into a terrain using the forest editor tool. To make the foliage move realistically in the wind you need to use vertex painting on the areas you want to sway. The colours are as follows:
- Red – Branch movement, large, slow, vertical movement to simulate a branch moving in the wind.
- Green – “Delay”, used to make the sway less artificial, the amount of green should ideally be random.
- Blue – Detail movement, small, fast, horizontal movements to simulate leaves shaking.
- White – Full movement
- Black – No movement
Keep in mind that each vegetation object can all be tweaked individually to adjust the power. Also, make sure things that shouldn't move are black or your tree trunks are going to look really strange.