How To Edit Vehicle Files/pl
TA STRONA JEST W FAZIE TŁUMACZENIA / THIS PAGE IS UNDER TRANSLATING
(Informacja: Ta strona Wiki została zacytowana z tego tematu, przez SleepyPickup, wszelkie prawa autorskie należą do niego: http://www.beamng.com/threads/4261-Tutorial-Vehicle-performance-and-components-modification-(Simple))
Celem tego poradnika jest wytłumaczenie ci co zrobić, aby twój pojazd stał się szybszy, lepiej sterowniejszy, lub dodać do niego coś czego wcześniej nie posiadał (tak jak ciekawszy zderzak czy próg).
Wprowadzenie
- Przed rozpoczęciem proponuję ustawić w grze tryb okienkowy, aby móc szybciej i łatwiej przełączać się pomiędzy Notatnikiem (Programem Tekstowym) a grą. Tą drogą po zmianie czegoś w notatniku, będziesz mógł zresetować swój pojazd (Ctrl + R) i natychmiastowo zobaczyć zmiany w jego parametrach.
- STWÓRZ KOPIE ZAPASOWĄ ORYGINALNYCH PLIKÓW
- Modyfikacja choćby najmniejszego kodu czy cyfry może całkowicie zmienić zachowanie pojazdu, na lepsze lub gorsze. Dużą częścią edycji twojego pojazdu będą próby i błędy, więc ucz się w miarę posuwania się naprzód i zrozum co i jak się odbywa. Oczywiście jeśli masz przykład pojazdu w swoim prawdziwym życiu, już masz dużą przewagę.
- Pierwszą rzeczą jaką robimy gdy tworzymy jakiś pojazd, jest otwarcie pliku pojazdu (nie modelu). I w jednej z pierwszych linijek możemy zobaczyć " "dragCoef":8,". Ja zawsze ustawiam to na 0. To powoduje, że możemy osiągnąć prędkość maksymalną o wiele łatwiej.
Okej, więc zaczynajmy.
Myślę, że powinienem użyć jakiegoś pojazdu jako przykład, więc może niech to będzie Ibishu Covet?
Mam uruchomioną grę w oknie i plik silnika jest tuż przy Notatniku.
Ulepszanie silnika
The Covet posiada 1.5 4 cylinder z dodaną opcją turbosprężarki z panelu z częściami, lub z wersją wyścigową/rajdową. Nie jest najwolniejszy, ale może zostać ulepszony jeszcze bardziej.
To jest twój pierwszy cel jeśli uzyskać od swojego pojazdu większej mocy silnika. Upewnij się, że masz odpowiednią sekcję (Silnik 1.5, lub Turbo Silnik 1.5), a następnie spójrz na ten kod:
To będzie podstawka, silnika 1.5
"enginetorque":[
["rpm", "torque"]
[0, 0],
[500, 65],
[1000, 93],
[2000, 132],
[3000, 143],
[4000, 148],
[5000, 153],
[6000, 144],
[7000, 122],
[7500, 91],
],
"engine":{
"idleRPM":1000,
"shiftDownRPM":3400,
"shiftUpRPM":6400,
"maxRPM":7500,
"inertia":0.08,
"friction":16
"brakingCoefRPS":0.15
"burnEfficiency":0.5
"throttleSensitivity":1.2
Teraz pobawmy się momentem obrotowym od sekcji RPM:
[0, 0],
[500, 150],
[1000, 250],
[2000, 350],
[3000, 450],
[4000, 550],
[5000, 650],
[6000, 750],
[7000, 850],
[8000, 750],
[9000, 700],
[10000, 700],
],
"engine":{
"idleRPM":1000,
"shiftDownRPM":3400,
"shiftUpRPM":6400,
"maxRPM":10000,
"inertia":0.05,
"friction":12
"brakingCoefRPS":0.15
"burnEfficiency":1.0
"throttleSensitivity":1.2
Zauważ, że zwiększyłem czerwoną linię do 10 tysięcy i zwiększyłem znacząco każdą sekcję. Zwiększyłem także spalanie na 1.0.
To zwiększa znacząco moc koni mechanicznych, jednak zauważasz teraz, że przekraczając czerwoną strefę 5 biegu nie idziesz już za szybko naprzód. Jest to spowodowane tym, że transmisja / skrzynia biegów nie może się wyrobić.
To prowadzi nas do następnej sekcji.
Transmisja / Skrzynia biegów
Spójrz na podstawowy kod szybkiego auta.
"name":"Ibishu Covet 4-Speed Automatic Transmission",
}
"engine":{
"transmissionType":"automatic",
"lowShiftDownRPM":1400,
"lowShiftUpRPM":3600,
"highShiftDownRPM":3300,
"highShiftUpRPM":6000,
// -1, 0 (neutral), 1, etc
"gears":[-2.9, 0, 2.72, 1.55, 1.05, 0.72]
"clutchDuration":0.25
"viscousCoupling":3.5
"lockingTorqueLimit":150
"enableLocking":true
Z większą czerwoną strefą i z większa ilością mocy, pojawia się wiele nowych sekcji, na które chciałbyś spojrzeć. Momenty zmiany biegu, czas blokowania i wskaźnik skrzyni biegów.
Tutaj jest to co teraz zmieniłem:
"transmissionType":"automatic",
"lowShiftDownRPM": 7300 ,
"lowShiftUpRPM": 9800 ,
"highShiftDownRPM": 7300 ,
"highShiftUpRPM": 9800 ,
// -1, 0 (neutral), 1, etc
"gears":[-2.9, 0, 1.0, 0.80, 0.65, 0.50, 0.40, 0.30 ]
"clutchDuration": 0.05
"viscousCoupling": 4.0
"lockingTorqueLimit": 850
"enableLocking":true
Okej, jest tu sporo do wyjaśnienia, więc:
First we have shift points, you want the engine to shift up near the redline (10k) but not at it, and shift down relatively close to the middle.
Next is coupling and torque limit. Coupling was 3.5, so I bumped it up a little, and torque limit acts like a clutch so it should be bumped up as well or the power will never get to the wheels.
Next is gears. I added 2 just for kicks, and made gears 1-4 quite lower, because of the power increase. More power means you can use lower gear ratios and achieve higher speed much quicker.
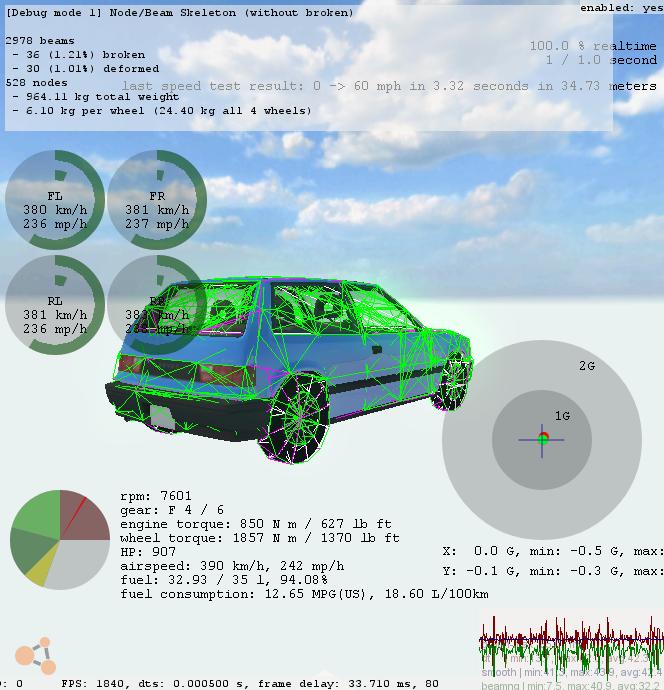
- I have the game open as I make this, right now this covet has a top speed of 250MPH before it starts to veer side to side. Quite the improvement from a slow 120hp, 100mph top speed. The 0-60MPH is also much quicker, 4.90 seconds. (Still stock tires)
So, you can spend a lot of time on engine/transmission alone, but I'll say for now 200MPH+ is good enough for now so let's move on.
Zawieszenie / Sterowność / Trakcja
There's a lot you can change in this department, and I don't really want to cover it all because it will take me way too long..and I'm hungry lol.
The file in question is called "hatch_suspension_F"
Lets look at the covet suspension, front sport: (important parts will be in red)
"hatch_coilover_F_sport": {
"information":{
"authors":"gabester",
"name":"Ibishu Covet Sport Front Coilovers",
}
"slotType" : "hatch_coilover_F",
"flexbodies": [
["mesh", "[group]:", "nonFlexMaterials"],
["hatch_coilover_F", ["hatch_shockbottom_F","hatch_shocktop_F"]],
],
"beams": [
["id1:", "id2:"],
//front shocks
{"beamPrecompression":1.04, "beamType":"|BOUNDED", "beamLongBound":0.0, "beamShortBound":0.18},
{"beamSpring":140000,"beamDeform":52000,"beamStrength":84000},
{"beamDamp":3400},
{"beamLimitSpring":601000,"beamLimitDamp":1600} ,
["fh1r","fs1r",{"beamDampRebound":4300}],
["fh1l","fs1l",{"beamDampRebound":4300}],
{"beamPrecompression":1, "beamType":"|NORMAL", "beamLongBound":1.0, "beamShortBound":1.0},
PreComp is ride height, Spring is stiffness, damp is dampening.
If you lower ride height, you might want to increase the spring rate, and if you do that it will actually ride higher because of the added stiffness. So again you will have to lower ride height, they go hand in hand really.
As you make it stiffer, you may need to increase the dampening to compensate for the bounce effect. Remember, trial and error. Experiment!
Lets look at the steering section:
{"beamPrecompression":1.0, "beamType":"|NORMAL", "beamLongBound":1, "beamShortBound":1},
{"beamSpring":22001000,"beamDamp":50,"beamDeform": 90000,"beamStrength":110000},
["fh3r","s1r",{"factor":-0.26,"steeringWheelLock":270}],
["fh3l","s1l",{"factor":0.26,"steeringWheelLock":270}],
The red beamstrength is tie-rod strength, normally I make it all 9's and cross my fingers. The section 'factor":0.26', deterimns how far the wheels turn, go slowly here, too much and your tie-rods will go bye-bye. Try maybe... instead of 0.26, try 0.3
Ok, so traction. Lets look at the wheels:
You want to look at: "hatch_wheels_F"
Track down the tire section for the wheel you want. Like the default wheel or 'rally'
{"frictionCoef":1.7},

//
{"pressurePSI":30},
{"maxPressurePSI":1400},
{"reinforcementPressurePSI":33},
Friction will be traction, up the number slowly, it doesn't take much. Try...2.0 maybe. Because of rollover problems with stiff suspension, or high traction, I set the PSI high, like 60. So the tire doesn't roll over on itself when cornering. (pretty much like real life on a large sidewall tire)
That's pretty much it for tires. Remember, trial and error. When you increase traction, you will find a lot of things change, you will have to visit suspension again.
Adding a differential
Ok, the Covet is FWD, this is boring. You probably want it to be AWD, so let's do that.
Sometimes the differential code is in the rear suspension file, or front suspension. Sometimes the engine file, in the case of the Covet, it is in the engine file.
Track down where the front differential is specified:
}
"hatch_differential_F_LSD": {
"information":{
"authors":"gabester",
"name":"Ibishu Covet Limited Slip Front Differential",
}
"slotType" : "hatch_differential_F",
"differentials": [
["wheelName1", "wheelName2", "type", "state", "closedTorque", "engineTorqueCoef"],
["FL","FR", "lsd", "closed", 120, 1]
],
"engine":{
"differential":4.37,
"axleFriction":10
},
This is the entire code for the front diff, lsd version. How do you add one for the rear? Copy it, place it under the front code and rename the important parts!
Like so:
}
"hatch_differential_ R _LSD": {
"information":{
"authors":"gabester",
"name":"Ibishu Covet Limited Slip Rear Differential",
}
"slotType" : "hatch_differential_ R ",
"differentials": [
["wheelName1", "wheelName2", "type", "state", "closedTorque", "engineTorqueCoef"],
[" RL","RR", "lsd", "clo sed", 120, 1]
],
"engine":{
"differential":4.37,
"axleFriction":10
},
One more thing, see the transmission code above the diff code? Find this:
"slotType" : "hatch_transmission",
"slots": [
["qtype", "default", "description"]
["hatch_differential_F","hatch_differential_F", "Ibishu Covet Front Differential"],
See the front diff code? Simply add a rear diff!
["hatch_differential_F","hatch_differential_F", "Ibishu Covet Front Differential"],
["hatch_differential_R","hatch_differential_R", "Ibishu Covet Rear Differential"],
There you go, now whatever transmission you add that extra rear diff to, it will show up in the part options menu.
Making your vehicle separate
So this Covet for example, lets say you want to make it separate from the rest so every time you update you don't lose your hard work.
- Rename the folder, and the .DAE file to the same thing. Like "awesome hatch"
- The file inside the folder, "name": Instead of %vehicleName = "Ibishu Covet"; Try, %vehicleName = "Ibishu Covet Custom";
- Test it, it should be a separate vehicle now.
Ok, well I was very vague and left some stuff out, but if you absolutely don't know anything, this should hopefully teach you how to start messing with your own files.
If there's any huge errors, or something that doesn't make sense, let me know and I'll fix it. This took a few hours to make and I'm very hungry, so I'll be back to edit this later.
Here's what this Covet looks like now:
0-60MPH is much better than stock, and 240MPH is pretty fun.