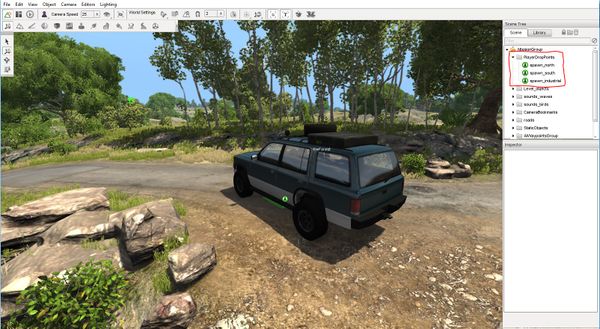
Multiple Spawn Points
This tutorial will show you how to add multiple spawn point to your map.
Prepairing the map
In this step we'll prepare the map to have more than one spawnSphere to define the spots where the user can spawn his/her vehicle.
Open up the map editor by pressing F11. Glance at the scene tree and search for the PlayerDropPoints group which you should expand. There should already be a spawnSphere in there which you can use to create your new ones by duplicating it. Click on the mentioned spawnSphere and use the shortcut Ctrl+C to copy it. Move the camera to the desired position and press Ctrl+V to paste it here. Fine adjust it afterwards by using the translation manipulator tool.
There are some things you need to take care of:
- first of all make sure that the newly created spawnSphere is a child of the PlayerDropPoints group as well. You can simply darg and drop it into that group.
- give it an unique name - you'll need it to define it in the next step.
Adjust info.json file
And here we go. Open up the info.json file of your map in a text editor of your choice.
There are two section you need to add to this file. First of all you need to add all the spawn points you added to a spawnPoints array.
Each element in this array contains the following three properties:
- translationId is the name of your spawn point which appears in the map selection menu. translationId might be a bit confusing. It called so cause almost any string can be translated to an other in BeamNG. Anyways you can just set the name of the spawn point here (e.g. "My favourite spawn point")
- objectname is the link between the map selection menu and the actual spawn point on the map. So it needs to get the exact same name as in the map editor.
- preview is the thumbnail which will also appear in the map selection menu.
"spawnPoints":[
  {
    "translationId":"levels.small_island.spawnpoints.spawn_north",
    "objectname":"spawn_north",
    "preview":"spawn_north_preview.jpg"
  },
  {
    "translationId":"levels.small_island.spawnpoints.spawn_south",
    "objectname":"spawn_south",
    "preview":"spawn_south_preview.jpg"
  }
]
Furthermore you should define the default spawn point.
Simply at the defaultSpawnPointName property to you json file followed by your personal default spawn point.
"defaultSpawnPointName":"spawn_north",
That's it.
In the end your json file should look like this:
{
    "title": "levels.small_island.info.title",
	"defaultSpawnPointName":"spawn_north",
    "description": "levels.small_island.info.description",
    "previews": ["small_island_preview.png"],
    "size": [2048,2048],
    "biome": "levels.small_island.info.biome",
    "roads": "levels.small_island.info.roads",
    "suitablefor": "levels.small_island.info.suitablefor",
    "features": "levels.small_island.info.features",
"spawnPoints":[
  {
    "translationId":"levels.small_island.spawnpoints.spawn_north",
    "objectname":"spawn_north",
    "preview":"spawn_north_preview.jpg"
  },
  {
    "translationId":"levels.small_island.spawnpoints.spawn_south",
    "objectname":"spawn_south",
    "preview":"spawn_south_preview.jpg"
  },
  {
    "translationId":"levels.small_island.spawnpoints.spawn_industrial",
    "objectname":"spawn_industrial",
    "preview":"spawn_industrial_preview.jpg"
  }
],
    "authors": "BeamNG"
}

