Skins in Photoshop
Getting Started
I recommend getting a DDS exporter for photoshop, like NVIDIA's Texture Tools(external link), before continuing.
To get the vehicle skin UV you must find your vehicle's content zip, for tutorial purposes I'm going to be using the Civetta Bolide.
Most vehicle files are located here:
Steam Users: Steam\steamapps\common\BeamNG.drive\content\vehicles
Other: BeamNG.drive\content\vehicles
the Bolide zip is called super(.zip), opening it shows all the bolide files. An example is visible on the right. If you see something similar to that, then you are in the right file.
The file we are looking for is called "vehiclename_skin_UVs.png". This is our skin template with the vehicle's wireframe.
Extract that file to a storage location accessible by photoshop.
Import it into photoshop like you would any other .png
file -> open -> extracted PNG directory -> select png and open
Editing
To start editing, I recommend creating a duplicate of the base UV and hide it in case of any mistakes leading to modification of that layer.
This can be done by right-clicking the layer (if freshly imported, its layer 0) and selecting duplicate layer. Hide the original layer by clicking the eye to the left of it.
To delete the black background and be left with a pure wireframe, go to Select and Color Range. Both are on the top bar.
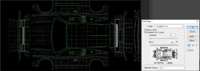
In the Color Range window, select the black background. you should have a preview similar to the image on the right.
If you get a gradient from white to black/gray, select the dropper icon that has a plus next to it and select the 4 corners and other places until you get a white preview like shown.
Pressing OK afterwards should leave you with moving dashed lines around most of your UV, pressing delete will remove the black portion if selected correctly and leave you with a white UV you can overlay or edit behind.
To change the wireframe color, right click on your UV layer, select blending options, go to stroke and check it, change the size to 1-4 pixels, make sure the position mode is on inside, and select the color you want on the bottom part. Clicking OK should change the wireframe to your selected color.
You can now make layers below that and begin your texture creation
Exporting
TODO