TrackBuilder
Contents
Getting Started
The Track Builder is an Ingame Editor which lets you create 3D tracks. You have control over a variety of things:
- Create the track from multiple, individually tweakable track pieces like straights, curves, spirals and loopings.
- Modify the bank, height and width of the track using a marker system.
- Select different border shapes for individual pieces and sides.
- Customize your track by creating your own materials and paint individual pieces.
- Place obstacles like pillars and ramps on your track to keep drivers on their toes.
- Create walls and ceilings of varying heights to form tunnels or narrow passages.
- Test, Save, Load and share your tracks.
This documentation explains the different aspects of the Track Builder in detail. For beginners, we recommend watching this tutorial video which covers the basics of how to use the Track Builder.
Overview
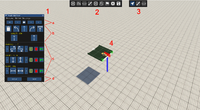
To open the Track Builder, either select the entry from the main menu, or select the Track Builder icon from the side menu when in freeroam mode. On your screen, you will then see the following:
- 1: Main Window: The big window with the header "Track Builder" is the Main Window. This contains the basic functionality to create a track.
- a: Navigation: Use these buttons to select different pieces of the track. You can also click Pieces to select them.
- b: Pieces: Here you find different pieces to add to your track.
- c: Modifiers: These are modifiers which can change the bank, height and width of your track.
- d: Drive: Use these buttons to actually drive on your track.
- 2: Window Toolbar: At the top of the screen, on the left side is the Window Toolbar. Here you can open additional windows which offer advanced functionality.
- 3: Mouse Function Toolbar: Next to the Window Toolbar is the Mouse Function Toolbar. It will show you what happens when you click on a piece.
- 4: Track Beginning: In the center of the screen is the beginning of the track itself.
You can then use the free camera controls: default keys are WASD to move the camera and hold right click to look around.
Basic Concepts
To understand how the Track Builder works, it is helpful to see how its different parts work together to create a track.
Pieces

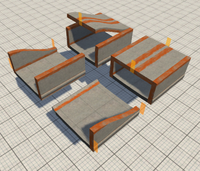
Every Track in the Track Builder is at its core a list of pieces, which themselves have parameters that describe them. Pieces can for example be Straight, Curve, or Looping", while parameters for these pieces could be Length, Radius or Offset.
In the Main Window, you can add new pieces to the end of the track by clicking on a piece button. To change the piece parameters, use the buttons below the piece buttons. To remove a piece, use the remove piece button next to the pieces. There is also the option to replace the current piece with a different one by holding control while clicking the piece button. Also, you can insert a new piece directly behind the currently selected one by holding shift and clicking the piece button.
Modifiers
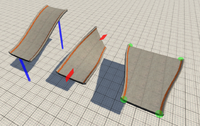
Modifiers, as their name implies, can modify the track you created. There are three kind of modifiers: Banking, Height and Width. Banking modifiers can be used to create banked turns, which are important in fast and curvy tracks. Height modifierslet you create slopes, hills and valleys. The Width Modifier can create wider and slimmer tracks. All of those Modifiers work through Markers which are placed on the track, in between the pieces. The markers define the value that a marker has, for example the actual elevation of a height marker. Once you have two of more markers of the same kind on your track, the system will interpolate the values and modify the pieces between those markers accordingly.
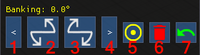
In the Main Window, you can use the modifier buttons to create a marker after the currently selected piece and so change the bank, height or width of the track. Furthermore, you can use the modify button to create a new marker with value of the previous marker at the current position, use the trash bin button to remove a marker at the current position, or use the reset button to create or set a marker at the current position to its base value. You can also shift markers to the next or previous piece by using the arrow buttons next to the modifier buttons.
- Bank markers are red rectangles that are tiled according to their bank value at the center of a piece. The base value for banking is 0°.
- Height markers are blue columns below a piece. The base value for height is 0m.
- Width markers are green spheres at the borders of a piece. The base value for width is 10m.
Selecing Pieces
To select a piece, you can click on it. The selected piece is highlighted in green. When adding a marker, it will be placed directly after the currently selected piece. Additionally, you can use the selection arrows at the top of the Main Window to navigate through the pieces one by one, or select the first or last piece of the track. You can also use the camera button to focus the camera on the currently selected piece.
Driving and Testing
To actually drive on your track, you can use the Drive button at the bottom of the Main Window. This will repair your car and place it at the beginning of the track. You can also use the Test button to place your car at the current selection. Please note that the collision of the track is only updated when you drive or test your track.
Additional Functionality
The track builder has a variety of things you can do. Every feature has its own window, which you can open by either clicking its icon on the toolbar at the top of the screen, or through the "Windows" menu entry on the top of the Main Window.
Advanced Modifiers
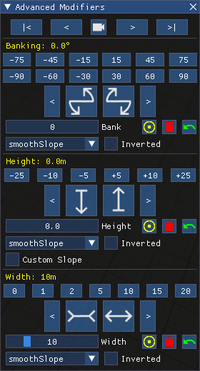
This window gives your further control over the three modifiers Bank,Height and Width.
Banking
The banking section has a row of Buttons for preset values ranging from -90° to 90°. Clicking on one of those will create a marker with the buttons value at the current selection. There is also a number input to set the banking to a custom value. You can also click and drag this input to change the banking smoothly.
Height
The height section allows you to modify the height in bigger steps. There is also an option to set a Custom Slope for this marker, which should be used if you want different interpolations in your track than the default smoothSlope and smootherSlope. Otherwise, there might be gaps at the position of the marker. Similar to the banking section, there is a number input to set the height to a custom value, which can also be dragged for smooth inputs.
Width
The width section gives you Buttons to set the width of the track to some preset values, as well as the regular buttons to make the track wider or slimmer. It also has a custom input which can be dragged. Note that the maximum width of a track is 50m.
Interpolations
Each of the modifiers has a drop down list to select the way this modifier is interpolated. The interpolation is tied to a marker and affects the region between the marker itself and it's direct predecessor. For most tracks, smoothSlope and smootherSlope should be used, as they connect smoothly to the next interpolated section.
Shift Marker
Same as in the Main Window, there are two buttons for each marker to shift a marker from the current position one piece forward or backward.
Advanced Pieces
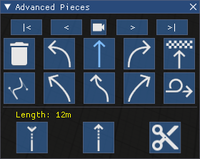
This window gives you additional pieces to chose from. At the top of the window, you see buttons to select and navigate through pieces as well as focus the camera on the currently selected piece. Below that, there are the actual buttons to add pieces, and below that the buttons to change the parameters of the currently selected piece.
Adding Pieces
When you click on a piece button, a new piece of this type will be added to the end of the track. If you hold the shift button while doing so, the piece will instead be added right behind your selection. Holding the control button will cause the currently selected piece to be replaced by the piece you clicked.
Deleting Piece
With this button, you can delete the currently selected piece. Please note that if there is only on piece on the track, you can't delete it. To remove if, you can selecte "Editor Settings" in the Main Window, and then click on "Remove Track". This will remove the whole track and close the Track Builder. This will also happen if you have only one piece on the track and close the Main Window.
Parameters
The Parameters of the the currently selected piece can be changed through the bottom group of buttons in this window. You can change the step size of changing these parameters by holding control (smaller steps) or shift (bigger steps) while clicking on the buttons.
Straight
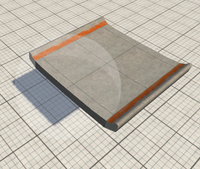
Straight Pieces are, as their name implies, straight. You can modify the following:
- Length: This changes the length of the piece.
- Cut: This cuts the piece into two equally sized straight pieces.
Curve
Curved Pieces are a perfectly circular arc of track. You can modify the following:
- Radius: This changes the radius of the piece.
- Length: This changes the arc length of this piece.
- Cut: This cuts the piece into two equally sized curve pieces.
Bezier
The Bezier Piece is the most powerful piece. There are numerous Parameters you can change for this piece:
- X-/Y-Offset: This determines the end position of the piece.
- Forward and Backward Length: These determine how "strongly" the direction of the start or end of the piece influence the overall piece shape.
- Directional Offset: This determines the direction the piece will end in.
- Global/Local: This button switches between a two coordinate systems for this piece: If local is selected, the end position of the piece is offset from the start position of the piece. If global is selected, the end position of the piece is offset from the origin of the track. The Global setting is useful when you want all the pieces after this Bezier to stay in their position while you modify pieces before it.
- Solid/Empty: This button toggles whether the piece is solid or not. Empty pieces can be used to create gaps in your track.
Spiral
The Spiral pieces have a shape that is very useful for connecting curved and straight pieces. You can change the following:
- Radius: This changes the radius of the curved end of the piece. Spirals and Curves with the same Radius fit together perfectly.
- Length: This changes the end angle of the piece. Longer Length means the transition from straight to curve happens over a longer distance and is thus smoother. Please note that this piece's length can only be 30°, 45°, 60° or 75°.
- Inward/Outward: This sets the spiral to either transition from a straight to a curve, or from a curve to a straight.
S-Curve
An S-Curve is defined by its shape which is the form of an S. The end of this piece will always "look" in the same direction as the beginning. You can change the following:
- X-/Y-Offset: This determines the end position of the piece. It is always offset from the beginning of the piece.
- Hardness: This changes how much the curved part of this piece bends.
Looping
This is a looping. Make sure the player can gain enough speed before entering the loop. You can change the following:
- Radius: This changes the size of the looping.
- Offset: This changes how much to the side this looping will go.
Close Track
Clicking this Button will create a Bezier Piece which connects to the start of the track. Make sure that the end of your track is at least a bit aligned with the start of your track. You can then further change this pieces parameters if you want.
Track Shape
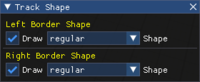
This window allows you to change the shape of the border of individual track pieces. You can select individual shapes for both sides of the tracks. To change the track shape, select a shape from the drop down list, make sure that the "Draw"-Checkbox of the side you want to modify is checked, and then click on the track piece you want to change. You can hold shift and click on a piece to select that pieces border shapes. You can also hold control and click on a piece to flood-fill modify the track: All adjacent pieces which have the same shape as the original piece will be changed to the shape you selected. This is useful if you want to modify a large section of track: simply change the last and first piece of the section, then flood-fill the pieces in between.
Please make sure that, in order to actually change the shape of pieces, the top right toolbar has the shape symbol highlighted. To stop modifying pieces, either close the Shape Window or select the "Selection" symbol in the top right toolbar.
Material Editor
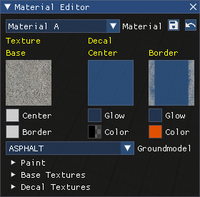
The Material Editor lets you change the material of individual track pieces, as well as modify the colors, glow, textures and ground model of existing materials.
Painting Pieces
To paint a piece, simply select a material from the drop down list at the top of the window and click on the piece yo want to paint. You can hold shift and click a piece to select the material of this piece. You can also hold control to flood-fill paint the track: All adjacent pieces with the same material as the one you clicked will be changed to your selected material. This is useful if you want to paint a large section of track: simply paint the last and first piece of the section, then flood-fill the pieces in between.
Please make sure that, in order to actually change the shape of pieces, the top right toolbar has the paint symbol highlighted. To stop painting pieces, either close the Material Editor Window or select the "Selection" symbol in the top right toolbar.
You can also only paint certain parts of one track piece: if you open the "Paint" section of the window, you can select which parts you want to paint. This is useful for painting only one side of the borders, or giving walls and floor a different color scheme.
There are 8 predefined materials, which you can modify however you like. You can use the Save Button next to the material selector to save this material. You can also use the Revert Button next to it to revert the material to the default values. When you save a track, the materials are saved with it.
Editing Materials
Materials have the following parameters you can change:
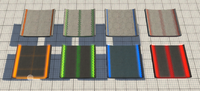
- Base Texture: This is the texture that is used as the ground layer of the appearance of the track. You can change the base texture by drag-and-dropping textures from the "Base Textures" section into the left slot at the top of the window.
- Base Colors: These color will tint the base textures for the material. You can select different colors for the base part and for the border, walls and ceiling parts. To change the color, simply click on the color squares below the base texture.
- Center Decal: This is the texture that will decorate the center part of the piece. You can change this texture by drag-and-dropping textures from the "Decal Textures" section in the center slot at the top of the window.
- Center Decal Color: This color will tint the center decal of the material. You can change it by clicking on the color square below the center decal texture.
- Center Decal Glow: This determines if the center decal will glow. You can change this by using the checkbox below the center decal texture.
- Border Decal: This is the texture that will decorate the border, wall and ceiling part of the piece. You can change this texture by drag-and-dropping textures from the "Decal Textures" section in the center slot at the top of the window.
- Border Decal Color: This color will tint the border decal of the material. You can change it by clicking on the color square below the border decal texture.
- Border Decal Glow: This determines if the border decal will glow. You can change this by using the checkbox below the border decal texture.
- Groundmodel: This sets the groundmodel of the material. You can select from a list of all available groundmodels through the groundmodel drop down list.
Obstacles

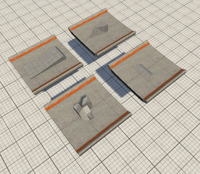
The Obstacle Window lets you place obstacles on the track on a per-piece basis. You can add a total of 10 obstacles per piece. To add an obstacle, simply click on the plus sign in the Obstacle Window. Each Obstacle can be modified through a number of parameters:
- Type: This is the Type of the Obstacle. You can chose from Cube, Bump, Sharp, Ramp and Obstacle.
- Variant: Each type comes in different variants.
- Anchor: This attaches the original position of the obstacle to either border or center. When you change it to Left or Right Border, the Obstacle will be moved when the width of the track is changed.
- Offset: This changes the original position of the obstacle along the length of the piece.
- Position: This offsets the obstacle from its original position.
- Scale: This scales the obstacle by a given factor for each axis.
- Rotation: This rotates the obstacle by a given angle.
You can also Remove and Copy each obstacle.
Walls and Ceiling
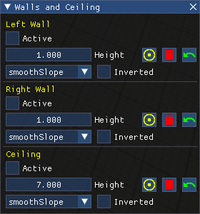
Through this window, you can create walls and ceilings of varying heights. This system works similar to the modifiers system for Bank, Height and Width. The main difference is that it is not the track that is modified, but the height of the walls and ceilings. In addition to a numerical value for the height, each marker stores a boolean value to set if the wall or ceiling on this marker is active or not active. To start a wall or ceiling, create a marker with the Active checkbox on, and to end the wall or ceiling, create another marker further down the track with the Active checkbox off.
Interpolations
For each part of these elements, there is a drop down list to select the way the height of the element is interpolated. The interpolation is tied to a marker and affects the region between the marker itself and it's direct predecessor.
Checkpoints
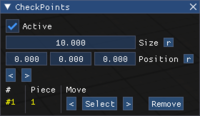
This window lets you customize the positions of the checkpoints on this track if you drive it through the time trials or light runner game mode. Please note that this is completely optional, and not required most of the time. If you don't place any checkpoints, they will be created automatically upon driving the track in time trials or light runner. To place a checkpoint, select the piece it should be on, and check the Active checkbox. Then, you can change the following parameters:
- Size: This determines the size of the Checkpoint.
- Position: This changes the position of the checkpoint from its original position at the end of the piece.
- Shift Checkpoint: With the two arrow buttons, you can shift the checkpoint to the next or previous piece.
There is also a list of all the checkpoints on your track in this window. You can use this to shift the checkpoints around, select or remove the checkpoints.
Track Settings
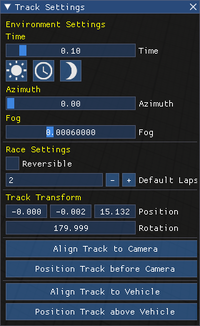
Through this window, you can change general settings of the track.
Environment Settings
Please note that this is disabled on the light runner map. Here, you can change the Time of Day, the Azimuth of the sun, and the fog settings. In the Save and Load Window, these settings can be saved for your track as well.
Race Settings
Here, you can change whether or not the track will be reversible, as well as the default lap count.
Track Transform
This will change the origin of the track. You can either change the coordinates and rotation degrees by hand using the Position and Rotation input, or use the buttons at the bottom of the window to position and align the track to the current camera or your selected vehicle.
Save and Load
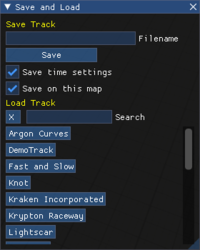
In this window you can save your track and load saved tracks. Tracks are saved in the user folder in the 'trackEditor' folder.
Saving a Track
To save a track, enter a name in the Filename field. You can chose to save the environment settings (disabled on the Light Runner map). You can also chose if the track should be saved on the current map: If this is checked, the track will appear in the time trials mode under the current map. If not checked, the track will be placed in the "Track Builder Tracks" map, which uses an empty map.
Once you have saved your track, you can also create a thumbnail for your track. Clicking on the "Create Preview" button will create a thumbnail using the current camera position and angle.
After you have created a thumbnail, you can also pack your track into a mod to share it. Click on the "Pack to Mod" Button. A .zip file will be created in your mod directory for you to share.
Loading a Track
To load a track, simply click on its name in the track list at the bottom of this window. You can also search for tracks by name using the Search input. Please note that if a track is not made for the level you have currently loaded, it might intersect with existing level geometry.
Quick Help
I can't drive on my track because my car goes right through!
The collision of the track is not updated in real time. To update it, click on either the "Drive" or the "Test" button in the Main Window. Even when your vehicle is already on the track after you changed something, the collision will only update when you click one of those buttons.
There is a small gap in my track where I placed a height marker!
When using the height marker with a different interpolation than smoothSlope or smootherSlope, the system is confused, because the slope at the point where the two pieces connect could be calculated "from either side". To fix this, check the Custom Slope checkbox in the Advanced Modifiers Window for the Height marker. You can then select how the one point between the pieces should be sloped.
I want to remove the track I built!
To remove a track, click on the "Editor Settings" at the top of the Main Window and select "Remove Track". There, you can also reset your track.
I can't select pieces by clicking on them anymore!
Make sure you have the "Selection" icon highlighted in the Mouse Function Toolbar at the top right of the screen. You can either click on it to select it, or close both the Track Shape and Material Editor Windows if they are open.
I accidentaly saved over one of the official tracks!
All user saved tracks are located in your user folder in the 'trackEditor' folder, while the official tracks are located in the game folder. You can remove or rename the track file in your user folder if it has the exact same name as one of the official tracks. Make sure to also rename the preview if you created one.