Vehicle Creation Guide
Contents
Introduction
Welcome to the Vehicle Creation Guide. This guide will help you create a basic vehicle from scratch, in a simple and understandable way. This guide will first teach you the basics, how to make a basic JBeam structure, and then how to reuse this knowledge in making a basic driveable vehicle.
In this guide, it's recommended that you have a text editor such as Notepad++, as well as a 3D modeling software of some type. This guide will cover Blender, as well as 3ds Max
Part 1 : File Structure
In order to start this guide, we need to create our file structure for our vehicle/structure. To do this, first navigate to Documents\BeamNG.drive\mods\unpacked. If the mods folder doesn't exist, or the unpacked folder doesn't exist, create it/them.
Next, we want to create the directory structure for our new vehicle. To do so, create the following folders inside of the unpacked folder:
tutorial\
 vehicles\
  tutorial\
Now that we have our basic file structure set up, we should create the files that will define how this vehicle shows up in the selector. Navigate to vehicles\tutorial\ and create the file info.json. The info.json file specifies the name, make, colors, and other important information about vehicles. Open up your info.json file , and input the following information
{
	"Name":"Tutorial Vehicle",
	"Brand":"Tutorial Co.",
	"Type":"Tutorial",
	"default_color":"White",
	"colors":{
		"White": "1 1 1 1.2",

	}
}
We can add more information later on, if needed, but this should get us started. At this point, you should be able to start up the game and see your vehicle in the selector, but you won't actually be able to use it just yet.
Next we need to create our base jbeam file. This will be one of the main files used throughout the tutorial. Create the file tutorial.jbeam, then open it, and insert the following content:
{
"MyVehicle":{
        "information":{
            "name":"Vehicle Name Here",
            "authors":"Your Name Here",
        }
        "slotType":"main",
}
}
If you want to, you can modify the information section. This section will be explained later in the guide.
At this stage, if you would like to add a preview image, create a 400x192 image, and save it in the same directory as default.png
Part 2 : The Basics
In Part 2 of this guide, we will be covering two of the most basic, and essential concepts behind JBeam structures : nodes and beams.
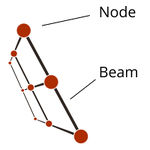
Nodes: Nodes are the core of BeamNG physics. Everything revolves around these mass points. A node itself is a dimensionless (infinitely small) mass point in 3D space.
Beams: Beams are the spring connections between nodes
Nodes and beams connect to form structures such as suspension, vehicle parts (fenders, doors), as well as a multitude of other uses. To start learning about these, we first need to add the proper sections into our JBeam file. Open your tutorial.jbeam file, then edit it to make it look like the following
{
"MyVehicle":{
        "information":{
            "name":"Vehicle Name Here",
            "authors":"Your Name Here",
        }
        "slotType":"main",
        "nodes":[
            ["id", "posX", "posY", "posZ"],
            {"collision":true}
            {"nodeMaterial":"|NM_METAL"},
            {"nodeWeight":10},

        ],

        "beams":[
            ["id1:","id2:"],
            {"beamSpring":1251000,"beamDamp":250},
            {"beamDeform":16000,"beamStrength":24000},
            //our content will go here

            //this last line resets important values
            {"beamType":"|NORMAL","beamPrecompression":1,"beamLongBound":1,"beamShortBound":1}
        ],
}
}
Once you have input this information, you will now be able to load up your vehicle in-game. Albeit,1 all you will be do is spin the camera around the spawn position at this point.
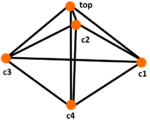
What we need to do to get at least something in-game, is create some nodes, and beams. Our goal structure for this section, will be a simple pyramid. Our pyramid will need 4 nodes, and 10 beams to create.
In order to start this structure, we'll be needing some nodes. I've already gone ahead and created the nodes section we will be starting with
        "nodes":[
            ["id", "posX", "posY", "posZ"],
            {"collision":true}
            {"nodeMaterial":"|NM_METAL"},
            {"nodeWeight":10},
            ["c1",-1,1,0],
            ["c4",1,1,0],
            ["c2",-1,-1,0],
            ["c3",1,-1,0],
            ["top",0,0,1],
        ],
Replace your nodes section with the above, then reload the vehicle in-game (CTRL+R). Press the "L" key to turn on Node Debug, and you should see a bunch of text laying on the ground. These are your nodes.
To explain it simply, beams are just connections between 2 nodes (excluding some special types). With that in mind, try to understand the following section before copying it into your file
        "beams":[
            ["id1:","id2:"],
            {"beamSpring":1251000,"beamDamp":250},
            {"beamDeform":16000,"beamStrength":24000},
            //our content will go here

            //outer ring of beams
            ["c1","c2"],
            ["c2","c3"],
            ["c3","c4"],
            ["c4","c1"],

            //inner cross (this makes it rigid)
            ["c2","c4"],
            ["c1","c3"],

            //connections to 'top'
            ["top","c1"],
            ["top","c2"],
            ["top","c3"],
            ["top","c4"],


            //this last line resets important values
            {"beamType":"|NORMAL","beamPrecompression":1,"beamLongBound":1,"beamShortBound":1}
        ],
Once you have the beams in the file, reload the vehicle in-game (CTRL+R), then press K to enter Beam Debug mode. You should see that your top node is now held up by the beams, and that there are now also connections on the bottom of the pyramid
Hopefully by the time you've reached this section, you'll have a basic understanding of what nodes and beams do.
Part 3 : Collision Triangles
Collision triangles are created between 3 nodes , and are able to collide with nodes in the current vehicle (given they have selfCollision), as well as other vehicles. Collision triangles can also provide drag, lift, and buoyancy. They are essential for smooth inter-vehicle collisions. If we currently tried to crash a vehicle into our current structure, you would see a lot of weird things happening because just the nodes on our structure would be colliding.
In order to start creating our collision triangles, we need a triangles section in our JBeam. You can define it like so
{
"MyVehicle":{
        "information":{
            "name":"Vehicle Name Here",
            "authors":"Your Name Here",
        }
        "slotType":"main",
        "nodes":[
            ["id", "posX", "posY", "posZ"],
            {"collision":true}
            {"nodeMaterial":"|NM_METAL"},
            {"nodeWeight":10},
            ["c1",-1,1,0],
            ["c4",1,1,0],
            ["c2",-1,-1,0],
            ["c3",1,-1,0],
            ["top",0,0,1],
        ],

        "beams":[
            ["id1:","id2:"],
            {"beamSpring":1251000,"beamDamp":250},
            {"beamDeform":16000,"beamStrength":24000},
            //our content will go here

            //outer ring of beams
            ["c1","c2"],
            ["c2","c3"],
            ["c3","c4"],
            ["c4","c1"],

            //inner cross (this makes it rigid)
            ["c2","c4"],
            ["c1","c3"],

            //connections to 'top'
            ["top","c1"],
            ["top","c2"],
            ["top","c3"],
            ["top","c4"],


            //this last line resets important values
            {"beamType":"|NORMAL","beamPrecompression":1,"beamLongBound":1,"beamShortBound":1}
        ],

        "triangles":[
            ["id1:","id2:","id3:"],
            {"dragCoef":10},
        ],

}
}
Now that we have our triangles section, we need to look for nodes on our current JBeam structure, that are suitable for collision triangles. Since collision triangles are dependent on being counter-clockwise for proper orientation, we need to choose our nodes carefully. In this case, we need the following triangles.
        "triangles":[
            ["id1:","id2:","id3:"],
            {"dragCoef":10},
            ["c3","c4","top"],
            ["c2","c3","top"],
            ["c1","c2","top"],
            ["c4","c1","top"],
            ["c3","c2","c1"],
            ["c3","c1","c4"],
        ],
To view our newly created collision triangles, click the Debug menu on the sidebar, make sure Enable Debug is checked, then find Collision Triangle Debug and tick it's corresponding checkbox.


