PressureWheels
pressureWheels
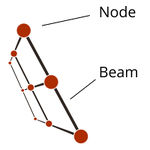
The pressureWheel is the primary method for creating wheels in BeamNG. It is a real time physical tire model made from nodes, beams, and triangles, but with many refinements, and code to automatically generate the tire geometry. The pressureWheel features tire carcass air pressure simulation based in the collision triangle system. The result is a much greater correlation to real world tire behavior compared the previous hubWheel, and a simpler, more intuitive set of parameters to tune behavior with. However, correct behavior requires correct tuning. It is recommended that the modder borrow value sets from official vehicles if the tires are a similar size and type, and then make small adjustments to taste. Keep in mind that node and beam scaling factors should be accounted for when transferring values between vehicles.
The pressureWheel replaced the hubWheel on official vehicles in version 0.3.7.4.
Wheel Definition
Example of pressureWheel definition:
"pressureWheels": [
 ["name","hubGroup","group","node1:","node2:","nodeS","nodeArm:","wheelDir"],
 ["FR", "wheel_FR", "tire_FR", "axle1", "axle2", 9999,  "brakeCaliper1", -1,  {"speedo":true, "nodeCoupling:":"brakeDisc1", "torqueArm:":"diff1", "torqueCoupling:":"diff2"}],
],
"name" is important for displaying in the debug, and also for integration with various functions in the game (such as the dynamic steering). Stick to using FR, FL, RR, RL for a 4 wheel vehicle.
"group" is the name of the wheel node group what the tire flexbody will assign to. The wheel generation code automatically places the inner and outer node "rings" in this group.
"hubGroup" is the name of the wheel node group what the wheel rim flexbody will assign to. The wheel generation code automatically places the axle and inner node "rings" in this group.
"node1" and "node2" are nodes that form the axle that the wheel is assembled around. The nodes themselves should be defined beforehand in a node section. These two nodes should also already have a beam between them of similar stiffness to the wheel hub beams, defined beforehand in a beam section.
"nodeS" is a stabilizing node. Each node from the hub will attach to this node with a beam. It's mostly legacy and not generally used. Putting 9999 in will disable it.
"nodeCoupling:" and "nodeArm:" form a pair of nodes to apply a braking counter torque to the suspension or body. The nodeCoupling should be defined beforehand in a node section, where the center of the brake disc would be. nodeArm should be defined beforehand in a node section, where the brake caliper would be. nodeArm and nodeCoupling should be aligned perpendicular to the wheel axle. In most cases this means they should both have the same X coordinate. If nodeCoupling is not defined, the game will default to using the inner wheel node as nodeCoupling, which may cause strange behavior in the suspension (exaggerated dive/squat when braking). Care should be taken that nodeArm and nodeCoupling are not too close together. The longer the distance between the nodes, the more stable and powerful the brakes can be. Heavier nodes will also allow more braking power and stiffness. For a typical car, they should be at least 2kg. For a large truck, as much as 5-10kg.
"torqueCoupling:" and "torqueArm:" form a pair of nodes to apply a driving counter torque to the suspension or body. The torqueCoupling should be defined beforehand in a node section, where the center of the differential output would be. torqueArm should be defined beforehand in a node section, where the source of the input torque to the differential comes from, ie, the nose/pinion of the differential, or some point on the transaxle. torqueArm and torqueCoupling should be aligned perpendicular to the wheel axle. In most cases this means they should both have the same X coordinate. If torqueCoupling or torqueArm is not defined, the game will default to not generating drivetrain torque reactions. Care should be taken that torqueArm and torqueCoupling are not too close together. The longer the distance between the nodes, the more stable the drivetrain will be. The heavier the nodes, the more stable the drivetrain will be. For example, car with a clutchtorque of 500Nm should have torque nodes that weigh at least 15kg, and at least 40cm apart, to give a rough idea. After all, a real car would need a strong and heavy differential to put down that much torque.
"wheelDir" is the direction that drive torque is applied. The correct value (1 or -1) also depends on which order you define the axle nodes.
Arguments
General Arguments
General settings determine the overall shape of the pressureWheel, and should be set to match the vehicle specifications.
| Name | Type | Optional | Default Value | Description |
|---|---|---|---|---|
| radius | n/a | Radius of tire tread (meters) | ||
| hubRadius | n/a | Radius of hub (meters) | ||
| wheelOffset | n/a | Offset of wheel midpoint from midpoint of axle nodes (meters) | ||
| tireWidth | n/a | Width of tire tread (meters) | ||
| hubWidth | n/a | Width of hub (meters) | ||
| numRays | n/a | Number of spokes per side of wheel (must be an even number!) | ||
| enableTireReinfBeams | false | Enable diagonal tire reinforcement beams.
Mimics the stiffness of the sidewall to tread connection of a real tire. | ||
| enableTireLbeams | false | Enable L-beam tire reinforcement beams.
Mimics the stiffness of the sidewall to tread connection of a real tire. Similar to TireReinfBeams, but a better method. If enabled, TireReinfBeams will be disabled. | ||
| enableTireSideReinfBeams | false | Enable extra anisotropic sidewall beams.
Adds longitudinal stiffness, most useful for tall sidewalls or high numRay tires. | ||
| enableTreadReinfBeams | false | Enable extra tread beams.
Improves lateral stiffness and reduces grip loss at high speeds. | ||
| hasTire | true | When disabled, only the hub will be generated, not the tire.
Used in common wheel system to allow different tire choices for one wheel rim. |
Tips:
It is a good idea generally to have the tireWidth slightly narrower than hubWidth for automotive tires.
Keep numRays between 10 for small basic wheels to 20 for smoothest running. While it is true that a high numRay wheel runs smoother, this effect is mainly only noticeable at low speed (<10km/h). High numRay wheels use considerably more nodes, beams, and triangles, using up more of the CPU budget. Wheels with high numRays will also struggle to achieve the cornering and longitudinal stiffness of a real tire, leading to smooth but vague handling. They may also suffer from greater amounts of expansion at high speeds.
Node Arguments
| Name | Type | Optional | Default Value | Description |
|---|---|---|---|---|
| hubNodeWeight | n/a | Mass of hub nodes (kg). | ||
| hubFrictionCoef | n/a | Friction coefficient of hub nodes. | ||
| hubNodeMaterial | n/a | Material of hub nodes .
Use |NM_METAL for metal hubs. | ||
| nodeWeight | n/a | Mass of tire tread nodes (kg). | ||
| frictionCoef | n/a | Friction coefficient of tire tread nodes.
Determines overall grip of the tire. | ||
| nodeMaterial | n/a | Material of tire tread nodes (kg).
Use |NM_RUBBER for rubber tires. |
Tips:
Don't forget about jbeam scaling factors! If present in the jbeam, they may influence the weight values you must enter.
Because part of the weight of a tire is in the sidewall and tire bead, start with a real life tire and wheel weight, but subtract some weight from the tire nodes and add it to the hub nodes.
To find the final weight of the pressureWheel, use the following formula: (nodeWeight+hubNodeWeight)*2*numRays*scaleNodeWeight. Or take a look in the node beam debug UI app in game.
Beam Arguments
| Name | Type | Optional | Default Value | Description |
|---|---|---|---|---|
| hubTreadBeam* | n/a | Spring, Damp, Deform, Strength of hub tread beams (across)
Keep spring as high as possible and damp very low (<10) | ||
| hubPeripheryBeam* | n/a | Spring, Damp, Deform, Strength of hub periphery beams (circumference)
Keep spring as high as possible and damp very low (<10) | ||
| hubSideBeam* | n/a | Spring, Damp, Deform, Strength of hub side beams (radial spokes)
Keep spring as high as possible and damp very low (<10) | ||
| wheelTreadBeam* | n/a | Spring, Damp, Deform, Strength of tire tread beams (across)
Spring and Damp primarily affects lateral stiffness from low to high slip angles (higher->stiffer) | ||
| wheelTreadReinfBeam* | n/a | Spring, Damp, Deform, Strength of diagonal tread reinforcement beams (across +-2 nodes)
Spring and Damp primarily affects lateral stiffness at low slip angles (higher_>stiffer) and also reduces grip loss at high speeds. Keep spring value between 1/4 to 1/2 of wheelTreadBeam values. | ||
| wheelPeripheryBeam* | n/a | Spring, Damp, Deform, Strength of tire periphery beams (circumference)
Spring and Damp affects longitudinal stiffness (higher->stiffer). Also affects compression stiffness, high speed expansion, high speed grip. | ||
| wheelSideBeam* | n/a | Spring, Damp, Deform, Strength of Anisotropic hub side beams (sidewall)
Spring and Damp Should be low to allow air pressure to handle weight of vehicle. | ||
| wheelSideBeam*Expansion | n/a | Expansion Spring, Damp of Anisotropic hub side beams in expansion (sidewall)
Spring and Damp affects longitudinal stiffness (higher->stiffer), rolling resistance(higher->better), sharpness of lateral grip curve (higher->sharper peak), compression stiffness to a small extent (higher ->stiffer in compression) | ||
| wheelSideReinfBeam* | n/a | Spring, Damp, Deform, Strength of Anisotropic hub side reinforcement beams (sidewall +-2 nodes)
Spring and Damp should be low to allow air pressure to handle weight of vehicle. | ||
| wheelSideReinfBeam*Expansion | n/a | Expansion Spring, Damp of Anisotropic hub side reinforcement beams in expansion (sidewall +- 2 nodes)
Spring and Damp affects longitudinal stiffness (higher->stiffer), rolling resistance(higher->better), sharpness of lateral grip curve (higher->softer peak), compression stiffness to a small extent (higher ->stiffer in compression) | ||
| wheelReinfBeam* | n/a | Spring, Damp, Deform, Strength of diagonal tire reinforcement beams, or L-beams (diagonal)
Spring and Damp affects lateral stiffness primarily at lower slip angles (higher->stiffer). Low values can make a tire that tends to roll onto the sidewall more under hard cornering. Too high of a value reduces aligning torque. |
Tips:
As a starting point, once you have realistic node weights, keep tire beam spring values very low, while increasing hub beam spring values until instability starts to occur. From there reduce hub beam stiffness about 5% and begin to tune tire beams.
Use the beam stress debug or node force debug visualizations (see debug menu) to make sure the tire is not unstable. Rapidly fluctuating colors or force arrows indicates instability.
Hub side beams can often handle a higher spring value than the hub tread or periphery beams. Hubs should always be as stiff as possible to limit deflection during cornering, and to limit high speed expansion of the wheel.
WheelSideBeamSpring should be very low or 0, but wheelSideBeamSpringExpansion should be very high, near instability limits. Same with the sideReinfBeam. This is to prevent high speed expansion of the wheel.
TreadBeamSpring should be very high, up to about 50-75% of the sideBeamSpringExpansion or at the limit of stability.
WheelReinfBeamSpring should be low, about 10-25% of the treadBeamSpring. Very high ReinfBeamSpring will make the tire feel more direct, but make the tire too stiff over bumps, and will reduce aligning torque/ffb feel.
WheelPeripheryBeamSpring should be nearly the same as treadBeamSpring for narrow tires, but stiffer for wide tires.
Hub damping should be kept low (2-20), but tire beams should have damping in the range of 10 to 30 for sidewall and periphery, 40-80 for tread and reinforcement.
Collision/Pressure Tri Arguments
| Name | Type | Optional | Default Value | Description |
|---|---|---|---|---|
| pressurePSI | n/a | Pressure in PSI that fills the tires
This value should be set to a realistic value for the tire size and application. | ||
| maxPressurePSI | n/a | Max tire pressure in PSI that fills the tires.
This primarily exists to keep internal pressure rising too high and causing instability when the tire is deformed. | ||
| triangleCollision | n/a | Sets whether tire triangles collide with the collision triangles of own vehicle or other vehicles.
When enabled, tires will not clip right through firewalls, for example, but may get stuck in sharp bodywork after a collision. More CPU resources are needed when this is enabled. | ||
| dragCoef | n/a | Sets fluid drag for the tires.
This value should be in the range of 5-20. It is a fairly small component of vehicle drag, but mainly important to make sure the tires don't fly through water unimpeded. |
Hints: BeamNG tires do not always benefit from higher pressures. It may make the tire feel more direct, but if it is too high, the car may become bouncy or shaky. Wide tires require less pressure than tall narrow tires. Here are some example tire pressures:
Car, typical road tire: 25-35psi
Car, racing slick: 22-27psi
Light truck: 30-50psi
Rock Crawler: 5-15psi
Heavy truck: 50-100psi
Aircraft: 100psi+
Other Arguments
| Name | Type | Optional | Default Value | Description |
|---|---|---|---|---|
| enableHubcaps | n/a | Allows hubcaps to attach to the wheel hub
More hubcap options can be defined as well, best to look at an official vehicle's hubcaps.jbeam file. | ||
| axleBeams | n/a | Defines beams which, when broken, disable drive torque to the wheel.
This represents the drive axles from the differential to the wheel. | ||
| propulsed | n/a | A value of 0 disables drive torque, a value of 1 allows engine torque to drive the wheel.
This option is usually placed in an engine, transmission, or differential slot, but zero'd out after the wheel definition. *Deprecated, differentials are now required instead* |
| Vehicle Creation | ||||||||||||||||
|---|---|---|---|---|---|---|---|---|---|---|---|---|---|---|---|---|
| Get started: Introduction to Vehicle Creation | ||||||||||||||||
| ||||||||||||||||
| See also: JBeam Examples • JBeam Physics Theory |